Lab 20 Instructions #
Reminders #
The last lab of the course. Congratulations!
While students are coming into class, feel free to go ahead and download the lab materials in preparation for the start of the lab proper. (But please wait until you’re instructed before beginning work on the lab.)
The format for this lab is quite different. You’ll be working together in your lab groups to understand and rewrite a piece of software.
Remember, class on April 20 and 25 are the final two of the oh-so-scarce CS51 lectures. They will be at 12:45 in the SEC 1.321 lecture hall.
Setup instructions #
Head to http://url.cs51.io/lab20 and follow the Lab Procedures.
Grayscale images and digital halftoning #
Today’s lab has you working with a piece of software to manipulate grayscale images, including performing digital halftoning, the conversion of grayscale to black-and-white. Digital halftoning is useful when presenting images on devices that only support a limited color palette, for instance, Kindle ebook readers or black-and-white printers.
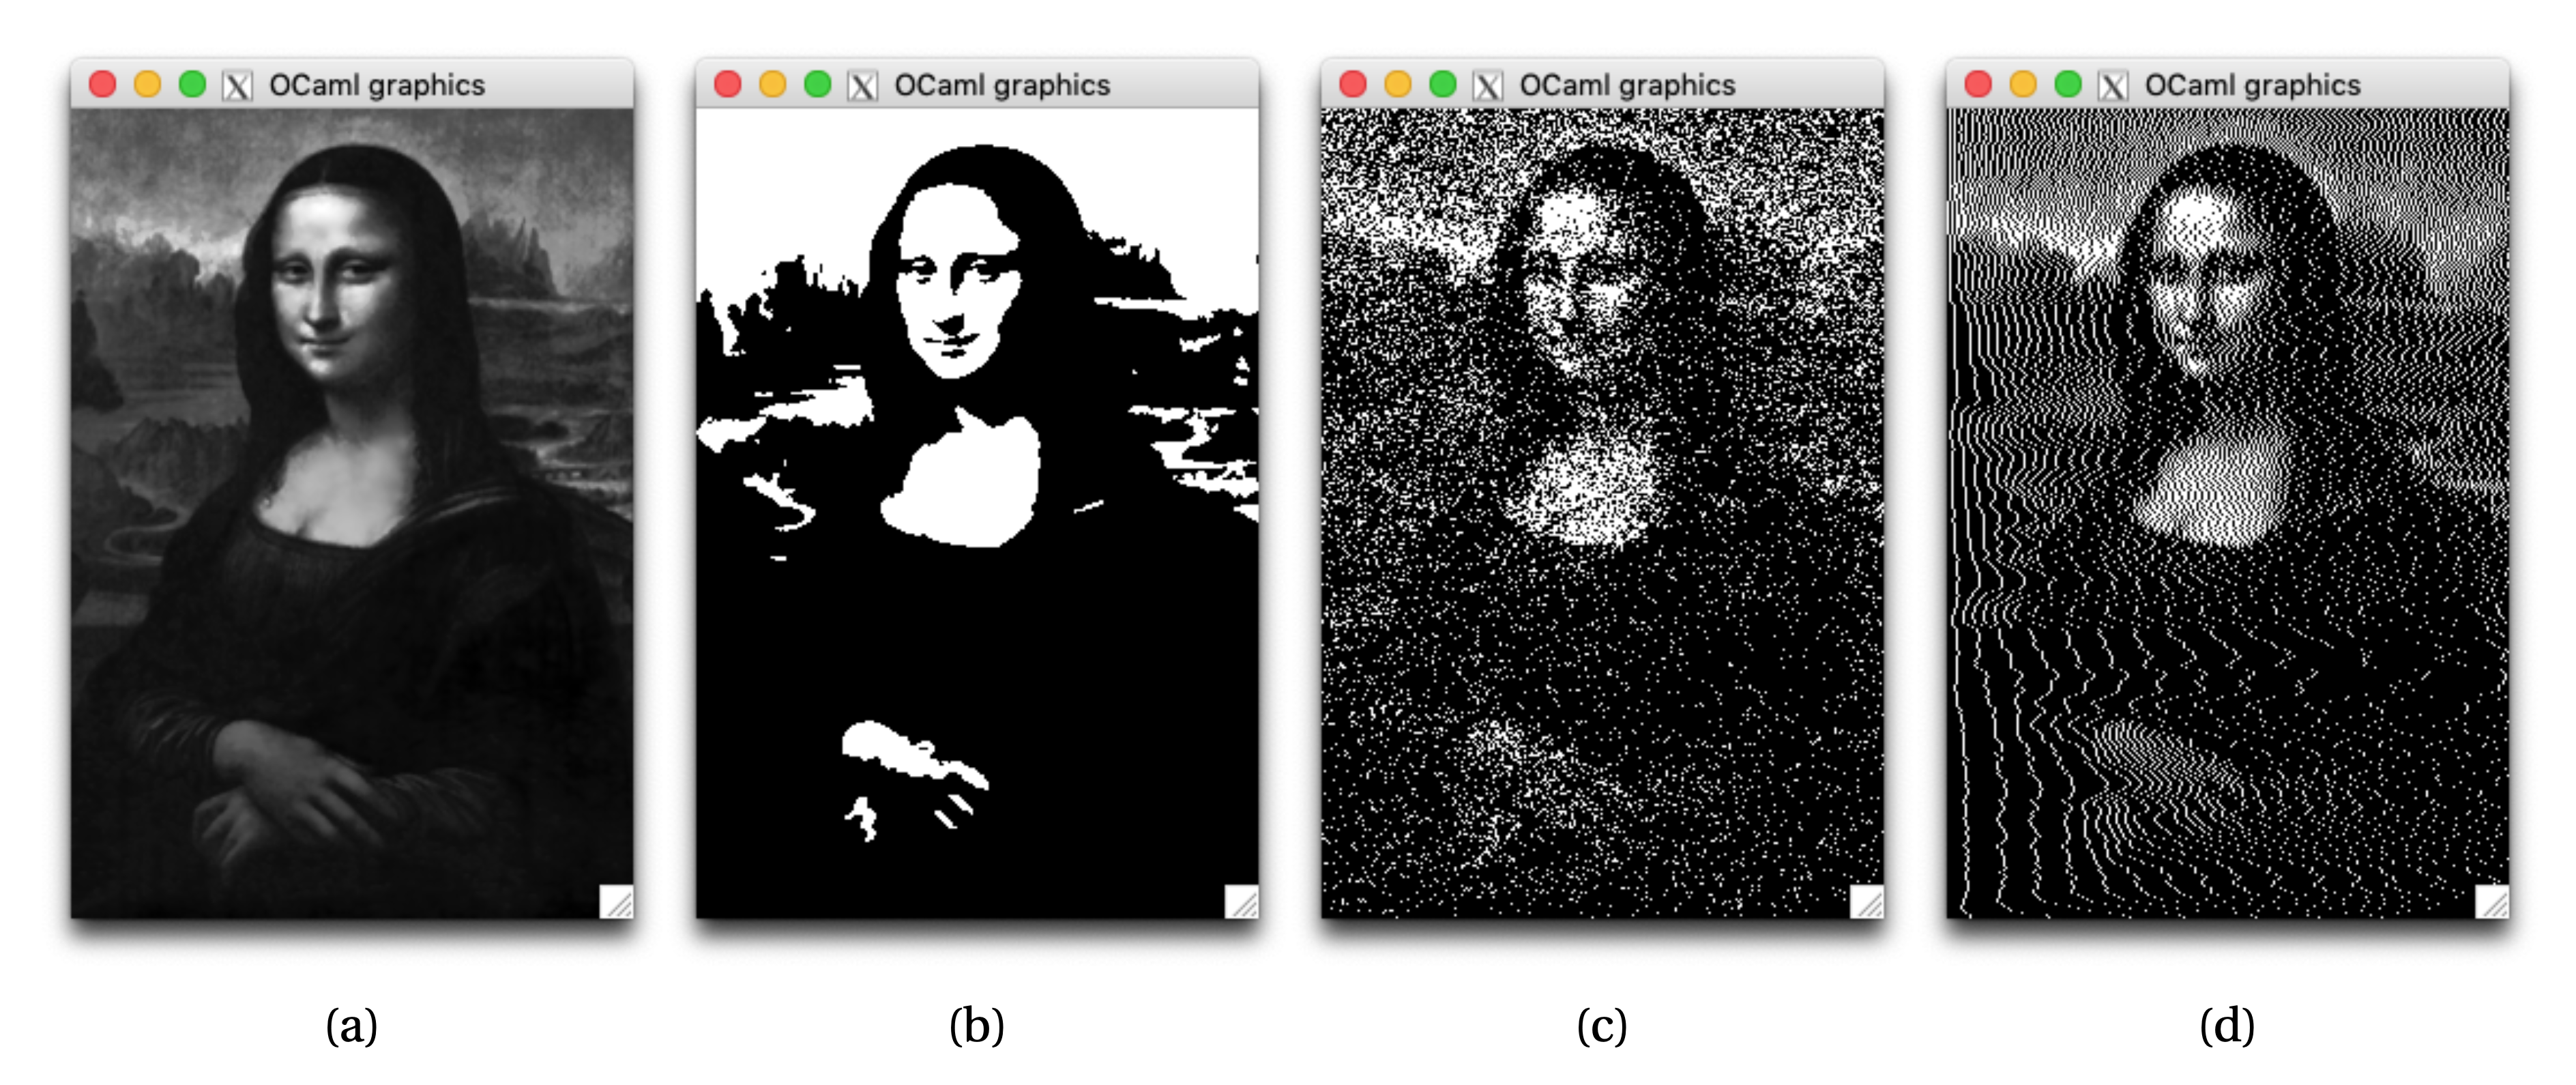
Figure 1: Three versions of the Mona Lisa. (a) A grayscale version, rendered using 256 gray levels. (b-d) Three binary (black-and-white) versions generated by different digital halftoning algorithms: (b) thresholding with a threshold of 75%; (c) dithering; and (d) one-dimensional error diffusion.
By way of example, Figure 1(a) is a grayscale image of Da Vinci’s
Mona Lisa, rendered using
OCaml’s Graphics module, which allows for 256 gray levels. Figures
(b), (c), and (d) show versions that have been digitally halftoned
into binary (black-and-white) images using three different
algorithms. In (b), each pixel has been thresholded; pixels darker
than the threshold value – 75% gray, that is, values 0.75 and
greater – become black, and those lighter than the threshold become
white. Thresholding tends to eliminate detail, as seen in the
example. In (c), a technique called dithering is used, which retains
some of the detail at the cost of some washing out of the image. Each
pixel’s gray level is interpreted as a probability, and the pixel
becomes black with that probability. The darker the pixel, the higher
the probability it ends up as a black pixel in the binary version. In
(d), a method called error diffusion is employed (in particular,
one-dimensional error
diffusion), which operates by
thresholding pixels, but propagating the “error” introduced by the
change in pixel value to adjacent pixels. As you can see, error
diffusion is a much higher quality method for digital halftoning.
In the file lab20.ml, you’ll find some code that implements
various image functions including the first two halftoning
algorithms. You can see them in action by compiling and running the
file:
 % ocamlbuild -use-ocamlfind lab20.byte
 % ./lab20.byte
If your OCaml is set up properly and the graphics module is working, you should see images like those in the figure pop up in an X11 window on your computer. Each one should appear for a couple of seconds before moving on to the next one. Try it now.
Now take a look at the code in the file lab20.ml. It works
(almost), but it’s a mess. Your job is to work with your lab group
to clean it up and improve it.
You should feel free to make any changes you want, including arbitrary changes to the types and implementations of functions, how they’re structured, how they’re distributed among files – anything at all. You’ll want to make changes so that the code is improved along any and all of the dimensions that we’ve talked about in the class. That shouldn’t be difficult, because the code is in such rough shape at the moment.
Given the open-ended nature of this lab (just like actual coding assignments in the real world!), you may wonder how we will be evaluating the lab. You’ll still submit the lab to Gradescope, but because we’ll have no way of knowing the functions and signatures that you’ll use, we won’t run any unit tests. Instead, we’ll just verify that the code compiles cleanly.