Problem set 0 #
Before we get to the substance of the course, this problem set makes sure that your development environment is set up, that you have access to the OCaml tools, that you’ve got git set up properly, and that you’re generally ready to get to work on the labs and problem sets in the course. We won’t be grading this problem set, so it’s your chance to get all of the kinks out of the development and problem set submission process. It proceeds in five phases:
- Setting up your OCaml development environment
- Creating and cloning the remote repository using Github Classroom.
- Compiling and running the problem set code.
- Writing your first OCaml program.
- Submitting your code to Gradescope.
Background: The Unix Command Line #
Click here if you're new to the command line/terminal
Regardless of your computer’s operating system, you’ll be interacting with it using the Unix command line (also called the terminal).
What is Unix? #
Unix is a family of operating systems originally developed at Bell Labs in the 1970s by Ken Thompson and Dennis Ritchie. While operating systems have many newer user interface features, some of the original features from Unix remain the most useful for programming work in CS 51.
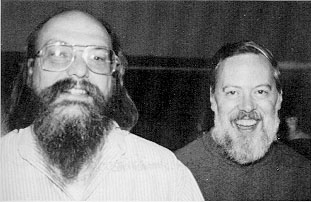
Ken Thompson and Dennis Ritchie
Ken Thompson (left; 1943–) and Dennis Ritchie (1941–2011), co-developers (with several others) of the Unix operating system, which underlies the design of many of the current operating systems in use today. They were awarded the Turing Award in 1983 for their work on Unix.
Users of the earliest Unix systems interacted with their computers exclusively through the keyboard, via the command line. They would type commands (names of short programs) that directed the computer to take action, like running a program to switch to a different folder or create a text file.
If you took CS 50, you ran commands in the command line on the CS 50 IDE. You will spend a good deal of time at the command line in CS 51, and comfort with it, developed over time, will be one of the skills you build in this course.
Accessing the Command Line #
On macOS: Search for Terminal in Spotlight or look in Applications > Utilities. Launch it to get a terminal window with a command line prompt.
On Linux/Ubuntu: Right-click on the desktop and select Open Terminal.
On Windows: After setting up your Ubuntu VM (see Windows setup section below), you’ll access the command line from within Ubuntu.
Basic Commands #
At the command line prompt (we use % to represent the prompt), you can type commands. Here are some essential ones:
man - View the manual for any command
% man mkdir
Type q to exit the manual.
ls - List files and directories in the current location
% ls
cd - Change directory (move to a different folder)
% cd Documents        # Move into Documents folder
% cd ..              # Move up one level
mkdir - Make a new directory
% mkdir testdirectory
rm - Remove a file (be careful!)
% rm filename.txt
These ‘‘commands’’ are actually programs. You can run them with many different options (check man ls for examples).
For more guidance, see this command line tutorial.
Setting up your OCaml development environment #
Before diving into the problem set, you’ll need to set up your OCaml development environment. We’ve automated this process with a single command that installs everything you need.
Quick Setup (macOS and Linux) #
Open Terminal and run this one command:
curl -fsSL https://raw.githubusercontent.com/cs51/setup/main/cs51_install.sh | bash
The installation takes about 10-15 minutes and will install:
- OCaml 5.2.1 and the OPAM package manager
- Required development tools (git, Visual Studio Code, etc.)
- CS51-specific packages and utilities
- Graphics libraries for GUI programming
What to expect: Near the end of the installation, the script will run a graphics check. You should see a small window appear with a white exclamation mark on a red background:

Graphics verification window
This window should appear if graphics is properly set up. Click the window and press any key to close it.
If you see this window, graphics is working correctly! Click it and press any key to close it, and the installation will complete.
When complete, restart your terminal (or run eval $(opam env)). You’re now ready to code!
Windows Setup #
Click here for Windows setup instructions
Because Windows is not a Unix-based operating system, we recommend installing an Ubuntu Linux virtual machine (VM) to get access to a Unix command line.
Installing VMware and Ubuntu #
Get VMware Workstation (free for Harvard students):
- Fill out this Google form requesting VMware Workstation 15
- Use your Harvard email address
- Wait for approval (may take up to a day)
- Download and install VMware from the WebStore
Download Ubuntu:
- Get Ubuntu 22.04 LTS from ubuntu.com
- Note: Ubuntu is free, no donation needed
Create Ubuntu VM in VMware:
- Launch VMware Workstation
- Go to Edit → Preferences → Display → check “Autofit guest”
- File → New Virtual Machine → Typical
- Select “Installer disc image file” and choose the Ubuntu
.isoyou downloaded - Set username and password
- Set disk size to 20GB minimum, “Split virtual disk into multiple files”
- Finish and let Ubuntu install (takes a few minutes)
After Ubuntu starts:
- Log in with your password
- Skip the “What’s new” screens
- Select “No, don’t send system info” when asked
Run the setup command:
- Right-click on desktop → Open Terminal
- Run the automated setup command:
curl -fsSL https://raw.githubusercontent.com/cs51/setup/main/cs51_install.sh | bash
Troubleshooting #
Manual Installation Steps (if automated setup fails)
If the automated setup script fails for any reason, you can install everything manually.
Background: The Unix Command Line #
You’ll be interacting with your computer using the Unix command line. On macOS, use the Terminal application (in Applications → Utilities). On Linux/Ubuntu, right-click the desktop and select “Open Terminal”.
The command line prompt is typically % or $. We use % in our examples.
Installing Package Managers #
On macOS:
Install Homebrew:
- Visit brew.sh and follow the installation instructions
- Verify:
brew(should show help menu)
Install XQuartz (for graphics):
brew install xquartzInstall opam:
brew install pkg-config
brew install gpatch
brew install opam
Restart your computer
On Linux:
Update package list:
sudo apt-get update -yInstall build tools and dependencies:
sudo apt-get install -y gcc make patch unzip m4 git xorg libx11-dev libxft-dev pkg-config opam libgmp-dev
Setting up OCaml #
Initialize opam:
opam init -aClose and reopen your terminal.
Create CS51 switch with OCaml 5.2.1:
opam update
opam switch create cs51 5.2.1
opam switch cs51
Install required packages:
opam install -y graphics
opam install -y dune
opam install -y cppo
opam install -y menhir
opam install -y yojson
opam install -y utop
opam install -y merlin
Install CS51 utilities:
opam pin add https://github.com/cs51/utils.git -y
opam pin add https://github.com/cs51-staff/ANSITerminal.git -y
Update environment:
eval $(opam env)Restart your computer
Installing Visual Studio Code #
On macOS:
brew install --cask visual-studio-code
On Linux:
sudo apt-get install -y software-properties-common apt-transport-https wget gpg
wget -qO- https://packages.microsoft.com/keys/microsoft.asc | gpg --dearmor | sudo tee /usr/share/keyrings/packages.microsoft.gpg > /dev/null
ARCH=$(dpkg --print-architecture)
echo "deb [arch=${ARCH} signed-by=/usr/share/keyrings/packages.microsoft.gpg] https://packages.microsoft.com/repos/code stable main" | sudo tee /etc/apt/sources.list.d/vscode.list
sudo apt-get update
sudo apt-get install -y code
Verifying Graphics Setup
After installation, verify that OCaml graphics is working properly:
cs51-graphics-check
You should see a small window with a white exclamation mark on a red background. Click the window and press any key to close it. If it works, you’re all set!
If graphics doesn’t work on macOS:
Verify X11 libraries exist:
find /opt -name libX11.6.dylibShould find
/opt/X11/lib/libX11.6.dylibIf not found, reinstall XQuartz:
brew install xquartzThen restart your computer and retry.
If still not working, reinstall graphics package:
opam uninstall graphics
opam install graphics
Restart your computer and retry.
If still failing, manually link libraries:
cd
mkdir lib
cd lib
ln -s /opt/X11/lib/libX11.6.dylib libX11.6.dylib
Restart your computer and retry.
If graphics doesn’t work on Windows/Ubuntu VM:
If you see an error like Fatal error: exception Graphics.Graphic_failure("Cannot open display") or cs51-graphics-check stalls indefinitely:
Download and install VcXsrv:
- Download from SourceForge
- Install on your Windows host (not in the Ubuntu VM)
Configure VcXsrv:
- Follow the instructions in this video
- Key settings: Enable “Disable access control”
Restart and test:
- Restart your Ubuntu VM
- Try
cs51-graphics-checkagain
If issues persist, contact course staff for assistance.
Verifying Your OCaml Installation #
Now that you have OCaml installed, let’s verify everything is working. Open your terminal and type:
% ocaml
You should see something like:
        OCaml version 5.2.1

#
This is the OCaml read-eval-print loop (REPL), where you can type or paste OCaml code and see the output evaluated. To quit the REPL, press ctrl + D or type #quit;;.
You also installed a more-fully featured OCaml REPL called utop, which has useful features like auto-completion built-in. Try it:
% utop
It should also show OCaml version 5.2.1. Try typing the string "are we there yet?" (including quotes) followed by two semicolons and pressing enter:
# "are we there yet?" ;;
- : string = "are we there yet?"
(The # character represents the OCaml prompt; you don’t need to type it.)
Congratulations! You just ran your first OCaml code!
Great job making it this far. We know that getting your setup ready can be frustrating, but it’s an important part of the process. Now that you’ve done it, you’re ready to write some code.
Creating and cloning the remote repository using Github Classroom. #
If you aren’t already familiar with the git version control system
or you don’t have a github account, follow the instructions in the
“Setting up git” document.
To create your repository for this homework, go to http://url.cs51.io/ps0 and follow the directions to create a remote repository for you to use for this problem set. See the “Setup” section of the Problem set procedures for CS51 document for more detailed information.
You now have a remote repository to store your problem set, and a
local clone of that repository. Using cd, enter the directory that
was just cloned. When you run ls, you should see the files ps0.ml,
ps0_tests.ml, makefile, and _tags.
Compiling and running the problem set code #
We’ve provided a makefile that specifies instructions to compile the
problem set. When in the root directory for the problem set, you can
run the command
% make all
to compile the problem set, generating a file ps0.byte. Then run the
compiled file with the command
% ./ps0.byte
You should see:
----------------------------------------
Name: FIRST LAST

Year: Other: I haven't filled it in yet

50?: Other: I haven't filled it out yet

I'm excited about ....!

----------------------------------------
Writing your first OCaml program #
It’s time to write and submit your first OCaml program. Your job is to
edit ps0.ml.
Open up ps0.ml in your favorite text editor. (If you
don’t already have a favorite text editor, see the Programmers’ editors handout for our advice on text editors for OCaml
programming.) Follow the directions inside ps0.ml.
After you’ve made your changes, you should recompile and run the code. Once it is working to your satisfaction, it’s time to submit the problem set to Gradescope.
Submitting your problem set to Gradescope #
To submit the problem set, you should read and follow the instructions in the “Submission” section of the Problem set procedures for CS51 document.
That’s it. You’re done with problem set 0!